Building a Text-to-Speech Avatar App with ReactJS and Azure TTS Avatar AI

Have you ever imagined bringing your applications to life with talking avatars? In this tutorial, we’ll walk through the process of creating a Text-to-Speech (TTS) avatar application using ReactJS and Azure AI. This engaging feature converts text into a digital video, featuring a photorealistic human speaking with a natural-sounding voice. Whether you’re a seasoned developer or just starting, follow along to empower your applications with lifelike synthetic talking avatars.
watch the demo of the Azure Avatar in action!
Key Features of Text-to-Speech Avatar:
- Flexible Voice Selection:
- Choose from a range of prebuilt voices or even use a custom neural voice of your choice.
2. Language Support:
- Enjoy the same language support as Text-to-Speech, opening doors to a global audience.
3. Video Output Specifications:
- Both batch and real-time synthesis offer a resolution of 1920 x 1080 with 25 frames per second (FPS).
- Codec options include h264 or h265 for batch synthesis in mp4 format, and vp9 for webm format.
- Real-time synthesis codec is h264, with configurable video bitrate.
4. Prebuilt avatars:
- Provides a collection of prebuilt avatars.
5. Content creation without code:
- Provides a content creation tool in Speech Studio for creating video content without coding.
6. Custom Avatars:
- Custom text to speech avatar allows you to create a customized, one-of-a-kind synthetic talking avatar for your application.
Getting Started
Before diving into the code, make sure you have Node.js version 16.13.2 installed on your machine and a basic understanding of ReactJS.
You can find the complete working code here → https://github.com/hacktronaut/azure-avatar-demo.git
Step 1. Creating a relay token
NOTE: This method is currently deprecated. Microsoft has now provided a dedicated URL to fetch relay tokens for Avatar. Please refer Step 1.1 to get relay tokens
We need to get a relay token which will be used in Azure Avatar API. Following is the sample code on how to get a relay token:
Go to azure portal and create a communication resource https://learn.microsoft.com/en-us/azure/ai-services/speech-service/text-to-speech-avatar/real-time-synthesis-avatar
Create a Communication resource in the Azure portal (for real-time avatar synthesis only).
Here is an example of connection string :
NOTE: You need to put the entire string within double quotes and assign it to a variable.
After creating the communication resource, initialize it to a variable and run the following code.
const { CommunicationIdentityClient } = require("@azure/communication-identity");
const { CommunicationRelayClient } = require("@azure/communication-network-traversal");;

const main = async () => {
  console.log("Azure Communication Services - Relay Token Quickstart")

  const connectionString = "YOUR CONNECTION STRING"
 // Instantiate the identity client
  const identityClient = new CommunicationIdentityClient(connectionString);

  let identityResponse = await identityClient.createUser();
  console.log(`\nCreated an identity with ID: ${identityResponse.communicationUserId}`);

  const relayClient = new CommunicationRelayClient(connectionString);
  console.log("Getting relay configuration");

  const config = await relayClient.getRelayConfiguration(identityResponse);
  console.log("RelayConfig", config);

  console.log("Printing entire thing ",config.iceServers);
};

main().catch((error) => {
  console.log("Encountered and error");
  console.log(error);
})
You will get relay config printed on your console. Pickup username and credential from the relay config and save it somewhere, We will have to use this in our TTS application.
Sample relay config data :
 {
    urls: [
      'stun:relay.communication.microsoft.com:3478',
      'turn:relay.communication.microsoft.com:3478'
    ],
    username: '--------------------------------',
    credential: '---------------------------------',
    routeType: 'any'
  },
  {
    urls: [
      'stun:relay.communication.microsoft.com:3478',
      'turn:relay.communication.microsoft.com:3478'
    ],
    username: '----------------------------------------------',
    credential: '-----------------------------------------',
    routeType: 'nearest'
  }
Step 1.1. Creating a relay token (New Method)
You will need your azure speech key which is nothing but your cogSvcSubKey which will used in the config file.
Call this URL using postman or curl. Here I am using a dummy key for demo purpose 😆.
curl --location 'https://westus2.tts.speech.microsoft.com/cognitiveservices/avatar/relay/token/v1' \
--header 'Ocp-Apim-Subscription-Key: 3456b27223r52f57448097253rd6ca51'
Your response will be like this
{
    "Urls": [
        "turn:relay.communication.microsoft.com:3478"
    ],
    "Username": "......",
    "Password": "......"
}
That’s it you got your iceUrl, iceUsername and icePassword. Keep it somewhere because we will need it in the config file.
Step 2. Initialize a ReactJS Application
Create a react application
npx create-react-app azure-avatar-demo
cd azure-avatar-demo
Add following dev dependencies to your package.json file
  "devDependencies": {
    "bootstrap": "^5.3.2",
    "microsoft-cognitiveservices-speech-sdk": "^1.33.1"
  }
Install the dependencies
npm installBasically we have installed all the required dependencies now we can create simple interface which will render the Azure AI Avatar
In src directory create a directory called components. In components directory create a file Utility.js
Here is my directory structure
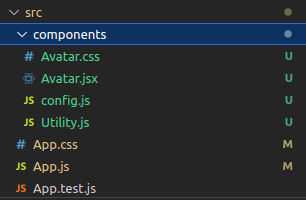
Now add the following code to Utility.js
//Utility.js

import * as SpeechSDK from "microsoft-cognitiveservices-speech-sdk";
import { avatarAppConfig } from "./config";
const cogSvcRegion = avatarAppConfig.cogSvcRegion
const cogSvcSubKey = avatarAppConfig.cogSvcSubKey
const voiceName = avatarAppConfig.voiceName
const avatarCharacter = avatarAppConfig.avatarCharacter
const avatarStyle = avatarAppConfig.avatarStyle
const avatarBackgroundColor = "#FFFFFFFF";


export const createWebRTCConnection = (iceServerUrl, iceServerUsername, iceServerCredential) => {

    var peerConnection = new RTCPeerConnection({
        iceServers: [{
            urls: [ iceServerUrl ],
            username: iceServerUsername,
            credential: iceServerCredential
        }]
    })

    return peerConnection;

}

export const createAvatarSynthesizer = () => {

    const speechSynthesisConfig = SpeechSDK.SpeechConfig.fromSubscription(cogSvcSubKey, cogSvcRegion)

    speechSynthesisConfig.speechSynthesisVoiceName = voiceName;

    const videoFormat = new SpeechSDK.AvatarVideoFormat()

    let videoCropTopLeftX =  600
    let videoCropBottomRightX = 1320
    videoFormat.setCropRange(new SpeechSDK.Coordinate(videoCropTopLeftX, 50), new SpeechSDK.Coordinate(videoCropBottomRightX, 1080));


    const talkingAvatarCharacter = avatarCharacter
    const talkingAvatarStyle = avatarStyle

    const avatarConfig = new SpeechSDK.AvatarConfig(talkingAvatarCharacter, talkingAvatarStyle, videoFormat)
    avatarConfig.backgroundColor = avatarBackgroundColor;
    let avatarSynthesizer = new SpeechSDK.AvatarSynthesizer(speechSynthesisConfig, avatarConfig)

    avatarSynthesizer.avatarEventReceived = function (s, e) {
        var offsetMessage = ", offset from session start: " + e.offset / 10000 + "ms."
        if (e.offset === 0) {
            offsetMessage = ""
        }
        console.log("[" + (new Date()).toISOString() + "] Event received: " + e.description + offsetMessage)
    }

    return avatarSynthesizer;

}
Let’s go through the code first
export const createWebRTCConnection = (iceServerUrl, iceServerUsername, iceServerCredential) => {
    var peerConnection = new RTCPeerConnection({
        iceServers: [{
            urls: [iceServerUrl],
            username: iceServerUsername,
            credential: iceServerCredential
        }]
    });

    return peerConnection;
};
This function is responsible for creating and configuring a WebRTC (Real-Time Communication) connection. WebRTC is commonly used for peer-to-peer communication in real-time applications. Here’s a breakdown:
iceServerUrl: The URL of the Interactive Connectivity Establishment (ICE) server.iceServerUsername: The username for the ICE server.iceServerCredential: The credential for the ICE server.- Initializes a new
RTCPeerConnectionobject, representing a WebRTC connection. - The
iceServersproperty is configured with the provided ICE server details. - Returns the configured
peerConnectionobject.
export const createAvatarSynthesizer = () => {
    // Configuring Speech SDK for Speech Synthesis
    const speechSynthesisConfig = SpeechSDK.SpeechConfig.fromSubscription(cogSvcSubKey, cogSvcRegion);
    speechSynthesisConfig.speechSynthesisVoiceName = voiceName;

    // Configuring Avatar Video Format
    const videoFormat = new SpeechSDK.AvatarVideoFormat();
    let videoCropTopLeftX = 600;
    let videoCropBottomRightX = 1320;
    videoFormat.setCropRange(new SpeechSDK.Coordinate(videoCropTopLeftX, 50), new SpeechSDK.Coordinate(videoCropBottomRightX, 1080));

    // Avatar Configuration
    const talkingAvatarCharacter = avatarCharacter;
    const talkingAvatarStyle = avatarStyle;
    const avatarConfig = new SpeechSDK.AvatarConfig(talkingAvatarCharacter, talkingAvatarStyle, videoFormat);
    avatarConfig.backgroundColor = avatarBackgroundColor;

    // Creating Avatar Synthesizer
    let avatarSynthesizer = new SpeechSDK.AvatarSynthesizer(speechSynthesisConfig, avatarConfig);

    // Handling Avatar Events
    avatarSynthesizer.avatarEventReceived = function (s, e) {
        var offsetMessage = ", offset from session start: " + e.offset / 10000 + "ms.";
        if (e.offset === 0) {
            offsetMessage = "";
        }
        console.log("[" + (new Date()).toISOString() + "] Event received: " + e.description + offsetMessage);
    };

    return avatarSynthesizer;
};
This function is responsible for creating and configuring an Avatar Synthesizer using the Speech SDK. Let’s break it down:
- It creates a
SpeechConfigobject from Azure subscription key (cogSvcSubKey) and region (cogSvcRegion). - Specifies the voice name for speech synthesis.
- Configures the video format for the avatar, including cropping settings.
- Defines an
AvatarConfigwith character, style, and video format settings. - Sets the background color for the avatar.
- Instantiates an
AvatarSynthesizerobject using the configured Speech Config and Avatar Config. - The function sets up an event handler for avatar events, logging relevant information.
- Returns the configured
avatarSynthesizerobject.
These two functions play a crucial role in setting up the WebRTC connection and configuring the Avatar Synthesizer, providing a foundation for the avatar application.
😃
You must be wondering what is the config.js and what does it contain ?. Well don’t worry I will show my sample config.js
Here is the sample config.js which you will have to create and put your keys in here…
export const avatarAppConfig = {
cogSvcRegion : "westus2",
cogSvcSubKey : "YOUR SPEECH KEY",
voiceName : "en-US-JennyNeural",
avatarCharacter : "lisa",
avatarStyle : "casual-sitting",
avatarBackgroundColor : "#FFFFFFFF",
iceUrl : "stun:relay.communication.microsoft.com:3478",
iceUsername : "YOUR USERNAME",
iceCredential : "YOUR CREDENTIAL"
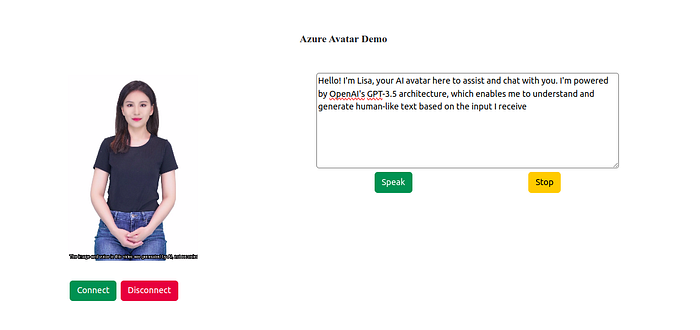
}Step 3. React Component for Avatar Display and Interaction
Now we are ready with the utilities and configs, Lets create a simple UI.
Let me first show you how the UI is going to look like
Create a file Avatar.jsx and put the following code:
import "./Avatar.css";
import * as SpeechSDK from "microsoft-cognitiveservices-speech-sdk";
import { createAvatarSynthesizer, createWebRTCConnection } from "./Utility";
import { avatarAppConfig } from "./config";
import { useState } from "react";
import { useRef } from "react";

export const Avatar = () => {

    const [avatarSynthesizer, setAvatarSynthesizer] = useState(null);
    const myAvatarVideoRef = useRef();
    const myAvatarVideoEleRef = useRef();
    const myAvatarAudioEleRef = useRef();
    const [mySpeechText, setMySpeechText] = useState("");

    var iceUrl = avatarAppConfig.iceUrl
    var iceUsername = avatarAppConfig.iceUsername
    var iceCredential = avatarAppConfig.iceCredential

    const handleSpeechText = (event) => {
        setMySpeechText(event.target.value);
    }


    const handleOnTrack = (event) => {

        console.log("#### Printing handle onTrack ",event);

        // Update UI elements
        console.log("Printing event.track.kind ",event.track.kind);
        if (event.track.kind === 'video') {
            const mediaPlayer = myAvatarVideoEleRef.current;
            mediaPlayer.id = event.track.kind;
            mediaPlayer.srcObject = event.streams[0];
            mediaPlayer.autoplay = true;
            mediaPlayer.playsInline = true;
            mediaPlayer.addEventListener('play', () => {
            window.requestAnimationFrame(()=>{});
          });
        } else {
          // Mute the audio player to make sure it can auto play, will unmute it when speaking
          // Refer to https://developer.mozilla.org/en-US/docs/Web/Media/Autoplay_guide
          //const mediaPlayer = myAvatarVideoEleRef.current;
          const audioPlayer = myAvatarAudioEleRef.current;
          audioPlayer.srcObject = event.streams[0];
          audioPlayer.autoplay = true;
          audioPlayer.playsInline = true;
          audioPlayer.muted = true;
        }
      };

    const stopSpeaking = () => {
        avatarSynthesizer.stopSpeakingAsync().then(() => {
          console.log("[" + (new Date()).toISOString() + "] Stop speaking request sent.")

        }).catch();
    }

    const stopSession = () => {

        try{
          //Stop speaking
          avatarSynthesizer.stopSpeakingAsync().then(() => {
            console.log("[" + (new Date()).toISOString() + "] Stop speaking request sent.")
            // Close the synthesizer
            avatarSynthesizer.close();
          }).catch();
        }catch(e) {
        }
      }

    const speakSelectedText = () => {

        //Start speaking the text
        const audioPlayer = myAvatarAudioEleRef.current;
        console.log("Audio muted status ",audioPlayer.muted);
        audioPlayer.muted = false;
        avatarSynthesizer.speakTextAsync(mySpeechText).then(
            (result) => {
                if (result.reason === SpeechSDK.ResultReason.SynthesizingAudioCompleted) {
                    console.log("Speech and avatar synthesized to video stream.")
                } else {
                    console.log("Unable to speak. Result ID: " + result.resultId)
                    if (result.reason === SpeechSDK.ResultReason.Canceled) {
                        let cancellationDetails = SpeechSDK.CancellationDetails.fromResult(result)
                        console.log(cancellationDetails.reason)
                        if (cancellationDetails.reason === SpeechSDK.CancellationReason.Error) {
                            console.log(cancellationDetails.errorDetails)
                        }
                    }
                }
        }).catch((error) => {
            console.log(error)
            avatarSynthesizer.close()
        });
    }

    const startSession = () => {

        let peerConnection = createWebRTCConnection(iceUrl,iceUsername, iceCredential);
        console.log("Peer connection ",peerConnection);
        peerConnection.ontrack = handleOnTrack;
        peerConnection.addTransceiver('video', { direction: 'sendrecv' })
        peerConnection.addTransceiver('audio', { direction: 'sendrecv' })

        let avatarSynthesizer = createAvatarSynthesizer();
        setAvatarSynthesizer(avatarSynthesizer);
        peerConnection.oniceconnectionstatechange = e => {
            console.log("WebRTC status: " + peerConnection.iceConnectionState)

            if (peerConnection.iceConnectionState === 'connected') {
                console.log("Connected to Azure Avatar service");
            }

            if (peerConnection.iceConnectionState === 'disconnected' || peerConnection.iceConnectionState === 'failed') {
                console.log("Azure Avatar service Disconnected");
            }
        }

        avatarSynthesizer.startAvatarAsync(peerConnection).then((r) => {
            console.log("[" + (new Date()).toISOString() + "] Avatar started.")

        }).catch(
            (error) => {
                console.log("[" + (new Date()).toISOString() + "] Avatar failed to start. Error: " + error)
            }
        );
    }


    return(
        <div className="container myAvatarContainer">
            <p className="myAvatarDemoText">Azure Avatar Demo</p>
            <div className="container myAvatarVideoRootDiv d-flex justify-content-around">
                <div  className="myAvatarVideo">
                    <div id="myAvatarVideo" className="myVideoDiv" ref={myAvatarVideoRef}>

                        <video className="myAvatarVideoElement" ref={myAvatarVideoEleRef}>

                        </video>

                        <audio ref={myAvatarAudioEleRef}>

                        </audio>
                    </div>
                    <div className="myButtonGroup d-flex justify-content-around">
                        <button className="btn btn-success"
                            onClick={startSession}>
                            Connect
                        </button>
                        <button className="btn btn-danger"
                            onClick={stopSession}>
                            Disconnect
                        </button>
                    </div>
                </div>
                <div className="myTextArea">

                    <textarea className="myTextArea" onChange={handleSpeechText}>

                    </textarea>
                    <div className="myButtonGroup d-flex justify-content-around">
                        <button className="btn btn-success" onClick={speakSelectedText}>
                            Speak
                        </button>
                        <button className="btn btn-warning" onClick={stopSpeaking}>
                            Stop
                        </button>
                    </div>
                </div>
            </div>
        </div>
    )
}
Here is the css code for Avatar.jsx
.myAvatarDemoText {
    font-size: larger;
    font-family: "Poppins";
    font-weight: 600;
}

.myAvatarContainer {
    text-align: center;
    margin-top: 5rem;
}

.myAvatarVideoRootDiv {
    margin-top: 3rem;
}

.myTextArea {
    height: 11rem;
    width: 35rem;
    border-radius: 5px;
    border-color: grey;
}

.myAvatarVideo {
    /* background-color: grey; */
    height: 20rem;
    width: 13rem;
    border-radius: 8px;
}

.myVideoDiv {
    height: 22rem;
    margin-bottom: 2rem;
}

video {
    margin: 0px 0px 20px 0px;
    padding-right: 5rem;
    width: 20rem;
    height: 22rem;
    border-radius: 8px;
}
Import the component in App.js
import { Avatar } from './components/Avatar';

function App() {
  return (
    <div className="App">
        <Avatar/>
    </div>
  );
}

export default App;
Now lets start the application
npm startYou can check the application at http://localhost:3000/
Lets test the Avatar AI 😄
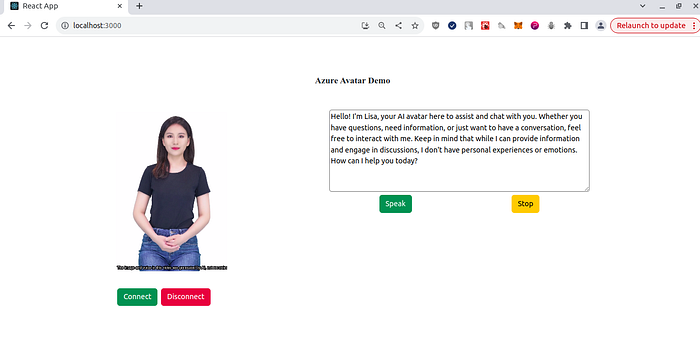
Initially you will not see any avatar, You need to click on Connect button to get the Avatar loaded.
After Avatar Connect, Paste the text into the box and press on speak and let the magic begin 😃
You will see that avatar actually speaks the text ! . Isn’t it amazing?
Congratulations! You’ve successfully set up a Text-to-Speech Avatar application using ReactJS and Azure AI. This powerful feature allows you to integrate lifelike synthetic talking avatars into your applications seamlessly. Feel free to customize the application further based on your requirements.
Explore more about Azure AI Text-to-Speech Avatar here and experiment with different settings and configurations to enhance your avatar’s capabilities. Happy coding!
